


I love a good party invitation. And it’s true what they say: the invitation always sets the first mood for the party/event. So that’s why I think it’s important to have a pretty invitation. Don’t you? These cuties can work for anything, really. Whether you’re throwing a birthday party, a bridal shower, a baby shower, a sleepover, or a craft night {like the invite shows}, you can’t go wrong with these invitations. And if you’re going for a fun and relaxed wedding, these could work for you as well.

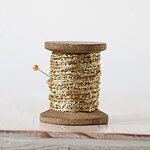
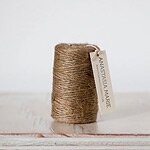
What you need: 1 base paper | 2 invitation paper | 3 weak tape | 4 zig-zag edged scissors | 5 scissors | 6 colored string

STEP ONE: Cut out your base.
Measure out a 4×6″ paper from heavy paper. For this, I chose a speckled light-colored kraft paper. Take your zig-zag edged scissors and cut along the long edges of your base card cut out. Try not to cut more than 1/8″ inch off.


STEP TWO: String away.
Take one string and secure it at the top with the weak tape, leaving a six inch tail. Start wrapping the string around the base card, using the zig-zag cut outs as nooks for securing the string. Side note: do not use the top three nooks on either side. You’ll need the extra space later. Once you get a pattern that you like, secure the string using the tape again at the bottom, but on the back of the base card this time. Leave a three inch tail.


Repeat this again using a second string of a different color. This time, secure the string at the top facing the opposite direction, so the two tails can tie a bow later. Secure the end as well, and leave a three inch tail.

STEP THREE: Tie a bow.
Use the two string tails at the top of the base card to tie a loopy bow. For the bottom portion on the backside of the base card, tie the two tails into a knot and trim the extra string.


STEP FOUR: Print your invitation.
Design, print, and trim your invitation to a 3.75×6.75″ sized rectangle. The top 1.5″ of the invite should be reserved for the main message. My main message was “You Are Invited,” but you can make it whatever you’d like. Center the text both vertically and horizontally in this 1.5″ space. The rest of the text should be centered both vertically and horizontally in the remaining 5.25″ space.


STEP FIVE: Insert the invitation.
Carefully {oh so gently} insert the invitation between the string and the base card. If you find that your invitation is somehow too wide, make any necessary trims. This will be far easier to do than re-stringing a wider base card. And time saving too! Push the invitation to the very bottom.

And now you’re FINISHED! No envelope is necessary. Why hide the beauty? Change up the string colors if you’d like too. It can never hurt.


This is what the back should look like:


© 2015 Anastasia Marie. All Rights Reserved.
You have my attention with this clever idea! You have the best paper ideas!
That is so cool! I’ve never seen anything like that, I’ll definitely try it sometime. Thanks for the inspirations, miss. :)
Definitely something new. Good job Stacey!
Thank you ladies!
[…] This is a really gorgeous DIY project, string-wrapped party invitations. […]